Work on the control panel has begun! (at least the design aspect). Some might ask what’s the delay, isn’t making control panel just a matter of getting a piece of wood and drilling holes for the buttons and joystick. Indeed, there was a control panel that came with the cabinet when I first bought it. However, I had to chop down its width so it could fit in the new reduced width of the cabinet. Although in the past I showed a picture of that control panel (see 5th Jan 2013 entry) there was no way I was going to use it for the VecCab – it had too many holes in it and the finish wasn’t pretty).
No, for the new control panel I wanted it to be perfect.
This meant the number of buttons, the positioning of them and the joystick have
to be in the optimum position. In
addition I had some other requirements. I’ve seen control panels where the
screws for holding the joystick are sticking out from the surface of the
control panel. For me I don’t like this. I want the surface of the control
panel to be completely smooth and want to later add a Lexan covering with coloured artwork. Also I am considering changing the joystick
from a digital one to an analogue one in the future and this will surely mean different
mounting hole positions.
First off, I found a very good website called www.slagcoin.com. They give extensive
information on the design and building of control panels. If you are making an
arcade cabinet control panel, this website is well worth the read. There are multiple ways of mounting buttons
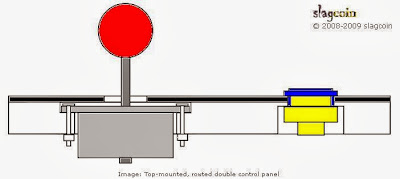
and the joystick on a control panel. I went for a design what slagcoin calls “Top
mounted, route double control panel”. Basically, the joystick is top mounted into a
routed wood panel, and a further sheet (I used a Perspex) is placed on top.

The next post will cover the placement of the joystick and buttons on the control panel. A lot of thought has to go into this as I don't want to have a control panel layout where after 10 minutes of playing you end up with a strain in your hand!
No comments:
Post a Comment