Friday 9 February 2024

"Other kids on the block"

Scrolling back in the blog you’ll see I have been off and on with the VecCab and Full upright Vectrex arcade using 19” monitor endeavours for quite a few years. Real life takes over, and  Vectrex development tasks get pushed to the back.

I’m still active with the Vectrex Fans Unit Facebook forum, and it’s a good place to be as you get to see the results of other Vectrex mad heads every now and then.

This often sparks me into continuing with my own developments. So fresh for me this week is seeing the images from Herve L’Helgoualch. He’s built a Vectrex arcade cabinet, housing two original controllers – in effect a two-player cabinet.

The cabinet is large, and he has shelves in the available space to store Vectrex games and overlays. The cabinet graphics are fantastic and in keeping with the overall Vectrex flavour. He made the graphics using Adobe Illustrator and printed them out on sticker sheets.

Herve, kindly allowed me to show his images here. He also gave a link which provides a lot of details about the build: Herve's link


Sunday 16 July 2023

That doesn't look like a normal Vectrex display?

I've had contact from a  YouTuber asking about the Vectrex screen in my VecCab and it not looking like a Vectrex screen.  It looks different to a normal Vectrex screen because I am using Ultraviolet (UV) light to light up a UV-painted overlay placed  in front of the Vectrex display. Not my idea but one I fell in love with when Laurence Bennion of Blacklighter.co.uk came up with UV printed overlays and James Watt of ClockWorkrobot.com started supplying UV flames. The frame gives a bright uniform light around the screen and allows the UV to be used in daylight. You have to see it to believe it but it really adds value to the game graphics. Depending on the brightness of the UV (I can set this by adjusting the power fed into the frame) imagery on the overlay can appear either on front of or behind the Vectors - the effect is almost holographic. In addition, the overlays are multi coloured also contributing to the appearance of multi-coloured Vectors on the Vectrex.

My favourite UV overlay is the "Moon" one as this one goes well with a lot of the Vectrex space-themed games.


The video of the Vectrex can't capture the beauty of the UV overlay and combined graphics but see below:


VecCab up and running!

After a long hiatus due to major house renovations, the house is returning to normality and my Vectrex-related hobbies can resume. Progress was made this weekend in clearing out a room to house the VecCab.

As you can see, it looks pretty good:


Readers who joined me from the beginning of this blog will recall that this cabinet is based on a JAMMA arcade cabinet, and what I did was to get the width of the cabinet reduced, so the small screen of the Vectrex wouldn't look so odd. The sizing works! Sure the Vectrex screen is smaller than a standard arcade cabinet, but the size is more in keeping with what represents a Cabaret cabinet style.

For those interested, here is what the side profile looks like:


I still have many things to work on this project. But it works, and with the VecFever plugged in it's easy to get distracted by playing Vector games rather than making further improvements.

Wednesday 22 September 2021

Vec-Cab Control Panel finally finished

 The completed control panel with the underside showing:


The control panel in action:


Monday 20 September 2021

The creation of Frankenstein

So, I  had a bit of an issue with accomodating all the circuity under the control panel when fitting it into the cabinet. The Hall board has the 9 pin d-connector that sticks out the wrong end (for my setup). But the biggest issue is that the screw shaft on the one side of the control panel which feeds into a mounting hole on a 90 degree angled support on the cabinet is too close to the Hall board PCB.  This wouldn't have been a problem had I designed the control panel before the Hall board. But the Hall board came after I built the control panel.


Not a problem. James Watt designer of the Hall board told me that the hashed area can be drilled in and cut off without risking damage to the PCB circuitry. Of course, cutting off one side of the Hall board which I have done according to the red straight line shown below does mean I lose the button connector. 


What I've done is add a dual in-line 10-way ribbon cable connector and soldered wires to the d-pin connector pads on the Hall board.


Monday 12 July 2021

Control Panel Enhancements (It's light, Jim, but not as we know it)

So, right from the beginning, I chose backlit arcade buttons. These buttons split into two parts. There's the part that comprises a LED and the actual switch. This inserts into the arcade button housing. These buttons have built-in LEDs. In the olden days, such buttons with flashing lights existed but would have used small filament bulbs.  

Interestingly when I bought these (3 blue and 1 red) arcade buttons, the LEDs were not all white light - and didn't rely on the semi transparent arcade button to tint the emitted light colour. The LEDs were actually coloured according to each button colour they were associated with. The blue arcade buttons actually had blue LEDs incorporated, and the red arcade button had a red LED incorporated.


This is an initial photo with all LEDs powered continuously.

But I don't just want them to be contiunuously on. I want them to serve a better purpose which would have worked in a Video arcade hall of the '80s. That is, the buttons would light in particular patterns to attract a passerby to press a button and insert some coins. So the idea is of a sequence of flashing buttons in a "player attract" mode. This is not an original thought. Walk into any casino or sea-side arcade today and you'll see all manner of gambling machines with lights flashing in various patterns and accompanied with weird electronic sounds just enticing you to part with your money.

The VecCab control panel is thus getting a bit more complex now. In addition to Clockworkrobot's Hall board that converts a digital joystick into an analogue one, I'm adding another circuit that will give some intelligence to the control panel. 

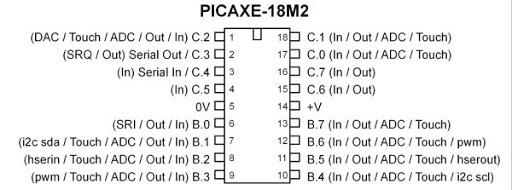
The intelligence is provided by a simple microcontroller. I've chosen a PICAXE18M2 device.These are really simple devices that you can program in a variant of BASIC. Once the program is compiled, it gets tokenised into code that can be downloaded into the microcontroller via a serial interface. I bought a couple of these at a couple of GBP each as I was really curious to see how easy they are  to use.


The idea will be to program it so the fire button (button 4) flashes and after a short while all the buttons flash. As soon as a button is pressed, the PICAXE will know a player is present. The button will then continuously light, or momentarily switch off (haven't decided yet) upon each press. If there is no player interaction with the game via the buttons, after a few minutes, the PICAXE will return to the "player attract" sequence of button flashing. So in action, if you are hitting buttons during game play the "player attract" mode is not visible. When the player walks away, the flashing button sequence starts again. 

Next step is build the circuit and program....